Wednesday, 23 January 2013

TOMATO SOUP


Tomato soup recipes are the favorite recipes of all age groups because of the taste, flavor and color of tomato soup. Hot tomato soup on a cold winters day feels good. Although you can have this tomato soup in summer as well, it is that good. And it’s very healthy for you as well. This fresh and simple Indian style tomato soup recipe is perfect for making tomato soup.


Tomato Soup Recipe


Ingredients:
  • 8 Tomatoes (medium size)
  • 3-1/2 cups Water
  • 1/2 tbsp Butter
  • 1/4 tsp Black pepper powder
  • 1/4 tsp Red chilli powder
  • 1/2 tsp Bay leaf and cumin powder
  • 1/4 tsp Ginger-garlic paste
  • Salt to taste
  • 2 tbsp Cream for garnishing
Method:
  • Put the tomatoes in a saucepan with water. Bring to a boil, reduce heat and cook until tomatoes become tender. You can also pressure cook it (wait for 2 whistles and then switch off the gas).
  • Make tomato puree in an electric blender. Add water and strain it to remove the seeds and tomato skin.
  • Heat butter in a pan.
  • Add black pepper powder, red chilli powder, bay leaf and cumin powder, ginger-garlic paste and salt.
  • Add tomato puree, bring to boil and cook for 5 minutes on medium heat .
  • Serve hot. Garnish it with cream separately in each bowl.

Monday, 21 January 2013

HOW TO MAKE CHAPATIS


Chapatis 

Ingredients

          2 cups of wheat flour
  • 1 cup of luke warm water [as need]
  • Salt required [mix in water]

Steps

  1. 1
    Put the wheat flour, salt and ghee into a bowl, and mix until crumbly.

  2. 2
    Add ½ a cup of the water to the flour mixture, and stir so it combines into a soft dough.

  3. 3
    Add the remaining water slowly, stirring until it's fully combinedKnead the doughfor 3 to 5 minutes.

  4. 4
    Place the dough into an oiled bowl, and cover. Leave covered for 40 minutes.
  5. 5
    Divide the dough into 10 or 12 small balls, and dip them into flour.

  6. 6
    Roll the dough with a rolling pin until the balls resemble thin, round pancakes.
  7. 7
    Heat a heavy based frying pan, and cook the chapati until blisters appear on the bread's surface. Turn over, and cook on the other side.
  8. 8
    Remove the chapati from the heat, and wrap in a tea towel until ready to serve.
  9. 9
    Finished.

Wednesday, 16 January 2013

TOMATO KADHI


Tomato Kadhi

Tomato-KadhiINGREDIENTS
Large tomatoes (cut into quarters):- 15Green chilies (slit lengthwise):- 2Vegetable/ canola/ sunflower cooking oil: - 3 tbsp


Cumin seeds: - ½ tsp
Mustard seeds: - ½ tsp
Fenugreek seeds: - ½ tsp
Curry leaves: - 10
Salt: - to taste
Red chili powder: - 1 tsp
Mixed vegetables (carrot, cauliflower, baby okra and green beans):- 3 cups
Fresh chopped coriander leaves to garnish


TOOLS REQUIRED

Pan
Serving bowl
Spatula


PREPARATION METHOD

Cook tomatoes in three cups of boiling water until tender and then mash. Strain through a soup sieve to prepare puree.
Pour water to achieve thin consistency and then keep it again on the flame. Allow this mixture to boil.
In a pan, heat oil over medium heat and put the fenugreek, cumin and mustard seeds along with curry leaves and green chilies. Fry well.
Instantly mix this mixture to the tomato puree and stir well.
Combine the salt, mixed vegetables and red chili powder. Mix and simmer. Cook until vegetables are cooked.
Sprinkle chopped coriander and serve hot.

Monday, 14 January 2013

HOW TO MAKE A HANDKERCHIEF

To make a handkerchief you need :


1. fabric
2. iron
3. scale
4. threaded needle

A) Purchase the fabric. Check the fabric content to see what kind of maintenance it will require in order to stay looking good. For everyday use, you will probably want something that is washable and requires little ironing.


B)  Wash and/or dry the fabric according to the manufacturer's instructions (before you make the handkerchief), and press.

C)  Using a ruler, measure and mark on your fabric the size handkerchief you want to make, plus two inches (5cm).


  • Typically, a man's handkerchief is 12x12 inches (about 30cm) square. A woman's is 8x8 (22cm) square, but since you are making your own, you may make it any size you prefer.
  • Using a sharp pair of scissors, cut the square(s).

D) Fold the edge over 1/2 inch (about 12mm) and press.


E) Fold over another 1/2 inch (about 12mm) and press.


F) sew all the corners by using straight stitch. or you can also use sewing machine to sew corners.


G) Iron and fold.


Saturday, 12 January 2013

STRAIGHT STITCH

Straight stitch

It is a simple way to connect two pieces of fabric.


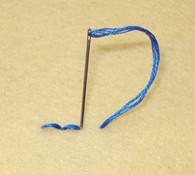
STEP 1:- take the fabric , thread the needle that matches the fabric color.

STEP 2:- Bring the needle out from the fabric, at a pint A.

STEP 3:- Put the needle in through a point B, as shown. This creates a single straight stitch. 

STEP 4:- to do running straight stitch then bring out the needle 1cm space apart from point B and repeat steps until your pieces of fabric joint together.

Friday, 11 January 2013

BACKSTITCH

Backstitch instructions 

It look like this :
Step 1:
Begin the backstitch by poking the needle up through the fabric, and then back down to make a single stitch. Then poke the needle back up through the fabric a space away from the first stitch, as if you were doing the running stitch.


Step 2:
Now poke your needle back down through the fabric at the end of the first stitch. This is the "back" part of the backstitch.


Step 3:
Now poke your needle up through the fabric a space away from the previous stitch. You will then stitch back again. Just repeat this pattern of stitching and you are good to go!


Thursday, 10 January 2013

HOW TO SEW A BUTTON HOLE

HOW TO SEW A BUTTON HOLE

 you have to need :

=>fabric

=>threaded needle

=> button

=>scissor

=>common pins(not compulsory)

1) Decide upon your buttonhole placement. Mark your fabric with a common pin.


2) Measure the size of your button. Using a ruler, measure the widest diameter of your button.


3) Cut a tiny slit in your fabric. For a snug fit, the slit should be slightly smaller than the diameter of your button. Stitching will slightly increase the size of the buttonhole.


4) Stitch around the opening of the buttonhole. Using double thread, stitch a tightblanket      stitch. Place one stitch next to another. Place a second row of blanket stitch over the first row of stitching, if needed.


5) Finished


HOW TO SEW A BUTTON

How to sew a button

step-1 Select a suitable button and thread that matches the button, the garment, and any thread used to sew on other buttons.


step-2 thread the needle and tie a knot

step-3 Position the button on the fabric. Line the button up with the other buttons on the garment.

Step-4 Push the threaded needle up through the fabric and through one hole in the button. Pull the thread all the way through on each stitch.

Step-5 Push the needle down through the next hole and through the fabric. Pull the thread all the way through. In this photo, the button was lifted up to show what's going where, but it's best to hold the button in place so it does not move.

Step-6 Bring the needle up through the first hole (for a 2-hole button) and pull the thread all the way through the fabric.

Step-7 Repeat the sewing process enough times to make sure the button is securely in place.

Step-8 On the last stitch, push the needle through the material, but not through a hole in the button.

Step-9 Pull the thread out into the area between button and material, remove the pin and pull up the button a little.

Step-10 Wrap the thread six times around the thread between the button and the material to reinforce the shank you have created.

Step-11 Push the needle back down through the material.


Step-12 Make three or four back stitches to secure the thread.

Step-13 Cut off the excess.


Monday, 7 January 2013

HOW TO THREAD A NEEDLE

HOW TO THREAD A NEEDLE

you have to need

1. thread


2. needle

3.  scissor


Steps to thread a needle

a) Cut a length of thread no longer than 36 inches (91 cm); any longer and it will get tangled      as you sew. Insert the thread through the eye of the needle.Hold the needle with your left hand and insert the thread with right hand.


b) hold the eye of the needle against bright light


c)Pull several inches of the thread through the eye of the needle. This will help keep the needle from becoming un-threaded as you work.


d)To make a knot. Hold the thread between your thumb and forefinger.


e) Wrap the thread around your finger, crossing it over itself.


f) Slide your finger and thumb against each other, rolling the thread.


g) Transfer pinch from index finger to middle finger.


h) Gently slide knot toward end of thread.


i) Finished knot.

watch the video click here